
If you’re craving a simple, sweet treat that’s perfect for any occasion, look no further than Vanilla Wafer Cookies. These cookies are the ultimate snack for those who want something easy to make but full of flavor. Whether you’re baking with kids, preparing a party snack, or simply indulging in a cozy treat, these cookies fit the bill. They come together with just a few ingredients and minimal effort, making them perfect for busy days when you want something delicious without the hassle.
But here’s the real secret: Vanilla Wafer Cookies aren’t just tasty; they’re also incredibly versatile! You can add a little twist by experimenting with different fillings, toppings, or even dunking them in your favorite drinks. Next time you want to impress your friends or treat yourself to something special, this recipe will be your go-to. So, what are you waiting for? Keep reading to discover how to whip up these delightful cookies and take your snacking game to the next level
A Classic Treat for Every Occasion
Simple Ingredients for Perfect Results
Making Vanilla Wafer Cookies is easy, and the ingredients are simple! The best part is that you probably already have most of them in your kitchen. You’ll need butter, sugar, vanilla extract, and of course, vanilla wafers. These basic ingredients come together beautifully to create a batch of cookies that are both light and flavorful. With just a few quick steps, you’ll have a delicious treat ready to enjoy. It’s a recipe anyone can follow, whether you’re an experienced baker or just starting out. So, don’t stress about complicated ingredients—this is all about simplicity and delicious results. It’s like building a quick snack with minimal effort but maximum flavor!
How to Achieve the Perfect Crunch in Every Bite
To make sure your cookies turn out perfectly crispy and crunchy, the baking time is crucial. Here’s a quick table for clarity:
| Step | Action | Result |
|---|---|---|
| Preheat Oven | 350°F / 175°C | Even baking |
| Baking Time | 10-12 minutes | Crispy edges, soft center |
| Cooling Time | 5-10 minutes | Maintains crunchiness |
This method ensures that you get that crispy, satisfying crunch in every bite. It’s like a perfect balance between texture and flavor—without any effort!

Crafting the Ideal Texture for Your Cookies
The Role of Butter and Sugar in Cookie Texture
Butter and sugar are key to achieving that melt-in-your-mouth texture in Vanilla Wafer Cookies. When you use butter, it adds moisture and richness to the dough, while sugar helps the cookies brown and become crispier on the edges. The right balance between these ingredients creates a cookie that’s both tender and crunchy. In addition, don’t forget that sugar affects the cookie’s spread during baking, so using the right amount will ensure your cookies hold their shape while still having that crispy finish.
Understanding How to Bake for the Right Consistency
To get the perfect cookie consistency, keep a few tips in mind. These steps are easy to follow:
- Preheat the oven: This ensures your cookies bake evenly from the start.
- Monitor baking time closely: Bake for 10-12 minutes for that perfect crunch.
- Cool properly: Let your cookies cool on a wire rack to maintain their crunchiness.
By following these simple steps, your cookies will have the ideal texture every time.
Customizing Your Vanilla Wafer Cookies
Adding Flavor Enhancements to the Recipe
Vanilla Wafer Cookies are incredibly customizable. You can add different extracts, like almond or hazelnut, to give the cookies a unique twist. In addition, you can mix in some lemon zest for a refreshing citrus note. If you’re feeling adventurous, a sprinkle of cinnamon or nutmeg will add warmth and spice to your cookies. These simple flavor enhancements can elevate the recipe, making it your own! The beauty of this recipe is that you can experiment and try different combinations, and each version will still be a hit.
How to Incorporate Fun Toppings or Fillings
Toppings and fillings are a great way to get creative with Vanilla Wafer Cookies! Here are some fun ideas:
- Chocolate chips: Add a handful of chocolate chips to the dough for a sweet surprise.
- Sprinkles: Top your cookies with colorful sprinkles for a festive look.
- Nut butters: Spread peanut or almond butter between two cookies for a fun twist.
- Fruit jams: Add a layer of your favorite fruit jam for a burst of sweetness.
These simple additions will take your cookies from basic to extraordinary!
The Best Way to Store and Preserve Vanilla Wafer Cookies
Tips for Storing Your Cookies for Freshness
After baking your delicious Vanilla Wafer Cookies, it’s important to store them properly to keep them fresh. Here’s a quick table for storage tips:
| Storage Method | Description | Best For |
|---|---|---|
| Airtight Container | Store at room temperature | Keeps cookies fresh for up to 1 week |
| Plastic Wrap | Wrap each cookie individually | Prevents cookies from getting stale |
| Cookie Jar | Keep on your kitchen counter | Ideal for quick access |
By following these tips, your cookies will stay fresh and delicious for longer!
How to Freeze Vanilla Wafer Cookies for Later Enjoyment
Freezing Vanilla Wafer Cookies is a great way to save some for later. Here’s how you can do it:
- Wrap each cookie: Place each cookie in plastic wrap or parchment paper.
- Store in an airtight container: Put them in a freezer-safe container to avoid freezer burn.
- Freeze for up to 3 months: When you’re ready to enjoy them, just thaw at room temperature.
By freezing them, you’ll always have a batch ready for when you need a sweet treat.
Pairing Vanilla Wafer Cookies with Drinks and Desserts
Best Beverage Options to Complement Vanilla Wafer Cookies
Vanilla Wafer Cookies go perfectly with a variety of drinks! Here are some ideas for the best pairings:
- Coffee: A cup of coffee adds a nice contrast to the sweetness of the cookies.
- Milk: Classic and comforting, milk complements the vanilla flavor beautifully.
- Tea: Try pairing with a light tea like chamomile or Earl Grey for a soothing experience.
These beverages bring out the best in the cookies, making them a delightful treat for any time of day.
How to Serve Vanilla Wafer Cookies with Other Desserts
If you want to elevate your dessert game, here are some fun ways to serve Vanilla Wafer Cookies:
- With ice cream: Sandwich a scoop of ice cream between two cookies for a yummy treat.
- As a pie crust: Crush them and use as a crust for a cheesecake or fruit pie.
- With fruit: Serve alongside fresh fruit for a light and refreshing pairing.
These fun ideas will help you turn your Vanilla Wafer Cookies into the star of any dessert table!
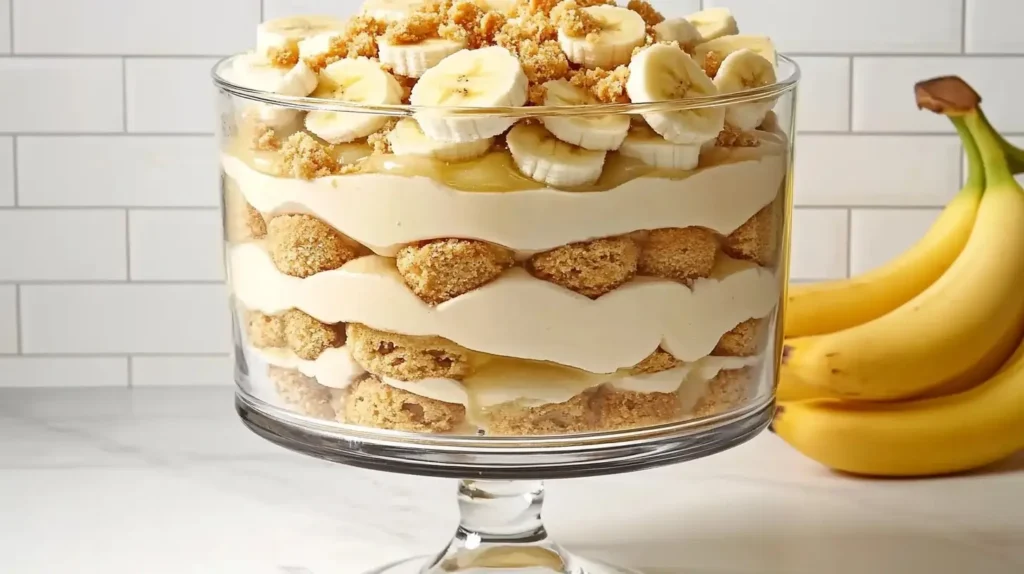
Ready to take your Vanilla Wafer Cookies to the next level? Let’s dive into a creamy, dreamy treat with this delicious Banana Pudding Parfait recipe—your new favorite way to enjoy those crispy cookies!
Ingredients
Let’s gather everything we need for this delicious Banana Pudding that will pair perfectly with your Vanilla Wafer Cookies. Get ready for a creamy, dreamy treat!
- 2 cups cold milk – The milk is the base of the pudding, giving it a creamy and smooth texture. It brings everything together, creating that classic pudding feel. You’ll love how it combines with the other ingredients to make the pudding extra rich!
- 1 (5 ounce) package instant vanilla pudding mix – Here’s the secret to making this dessert set perfectly. The pudding mix thickens the milk, transforming it into that luscious, velvety consistency we all crave. Plus, it brings a lovely, sweet vanilla flavor!
- 1 (14 ounce) can sweetened condensed milk – This is the magic ingredient that makes the pudding extra creamy and rich. It’s sweet, thick, and indulgent, adding the perfect level of sweetness to balance the tartness of the bananas.
- 1 tablespoon vanilla extract – For that extra hit of vanilla goodness! This ingredient really elevates the flavor and adds a deep, aromatic sweetness that perfectly complements the bananas and wafers.
- 1 (12 ounce) container frozen whipped topping, thawed – This whipped topping gives your pudding a light and fluffy texture. It adds a creamy, melt-in-your-mouth sensation that makes every bite feel like a cloud.
- 1 (16 ounce) package vanilla wafers – These are the stars of the show! The crispy wafers bring the crunch, complementing the creamy pudding and bananas. They provide that perfect contrast of textures and soak up all the flavors.
- 14 small bananas, sliced or to taste – Bananas bring a fresh, sweet, and slightly tangy flavor that pairs beautifully with the rich pudding and crunchy wafers. The bananas make this dessert fresh and light while adding a lovely fruity twist.
Step-by-Step Instructions
Now let’s put everything together and create this dreamy Banana Pudding with Vanilla Wafer Cookies. Follow these simple steps, and you’ll be enjoying your treat in no time!
- Step 1 – Start by whisking together the cold milk and instant vanilla pudding mix in a large bowl. Whisk until it thickens, about 2 minutes. This will create the smooth, creamy base for your pudding.
- Step 2 – Add the sweetened condensed milk and vanilla extract to the pudding mixture. Stir until everything is well combined. This is where the magic happens, making the pudding ultra-sweet and rich.
- Step 3 – Gently fold in the thawed whipped topping until the mixture becomes light and fluffy. This adds that airy texture, making each spoonful melt in your mouth.
- Step 4 – In a large serving dish, layer the bottom with a portion of vanilla wafers. Follow it with a layer of sliced bananas, and then spread some pudding mixture over the top. Repeat the layers until all ingredients are used up.
- Step 5 – Finish by topping the pudding with a final layer of whipped topping and a few extra banana slices for garnish. Refrigerate the pudding for at least 2 hours to allow the flavors to meld and the dessert to set.
Serving
Once your Banana Pudding is ready, it’s time to serve up this sweet and creamy delight!
- This recipe serves 8-10 people.
- How to serve – Scoop a generous portion into individual bowls, making sure to get a bit of everything: pudding, bananas, and vanilla wafers. It’s great on its own, but you can even serve it with a side of extra Vanilla Wafer Cookies for more crunch.
- Optional garnishes or pairings – Try topping with a sprinkle of cinnamon or even a few crushed nuts for added texture. You can also pair this dessert with a refreshing glass of iced tea or lemonade to balance the sweetness.
- For a fun twist – Add some chocolate chips or shaved chocolate on top for a sweet contrast. Or, try layering it in mason jars for an individual serving option at parties!
What to Serve with Banana Pudding
- Purple Black Bean Soup Recipe: A hearty and comforting soup that pairs wonderfully with sweet desserts.
- Chocolate Chocolate Chip Pancakes: These indulgent pancakes are perfect for breakfast or as a delicious treat alongside your banana pudding.
- Chicken Salad with Apples: A light, fresh salad that provides a savory balance to the creamy banana pudding.
- 4-Ingredient Banana Bread: Enjoy a simple and sweet banana bread to complement your dessert with a familiar banana flavor.
Tips and Hacks
- Tip 1 – To make the layers even more flavorful, toast the vanilla wafers in the oven for a couple of minutes before adding them to the dessert. This brings out their sweetness and adds an extra layer of crunch.
- Tip 2 – Use ripe bananas for the best flavor. Bananas that are just starting to turn yellow will give a perfect balance of sweetness and texture.
- Tip 3 – Make the pudding even more decadent by adding a layer of Nutella or peanut butter between the wafers for a fun twist. It will give the dessert a richer flavor and a creamy surprise in every bite.
- Tip 4 – You can make this recipe ahead of time! The pudding stays fresh in the refrigerator for up to 3 days, so feel free to prepare it the night before. Just keep it tightly covered to ensure it stays fresh and creamy.
Nutrition Facts
Serving size: 1/10 of recipe
- Calories: 260
- Fat: 12g
- Carbs: 35g
- Protein: 3g
- Sodium: 85mg
- Fiber: 2g
Please note: These values are estimates based on ingredient brands, portion sizes, or preparation methods used.
Prep Time
- Prep time: 15 minutes
- Cook time: 0 minutes (No cooking required!)
- Total time: 2 hours 15 minutes (Including refrigeration time)
Please note: The total time includes the 2 hours needed to refrigerate the pudding and allow the flavors to meld.
Frequently Asked Questions (FAQs)
What is the difference between Vanilla Wafers and Nilla Wafers?
Vanilla Wafers and Nilla Wafers are very similar, but Nilla Wafers are a specific brand made by Nabisco. The main difference is the name, which is trademarked. Both types of wafers are sweet and crunchy, perfect for snacking or baking. You’ll find Nilla Wafers to have a slightly richer vanilla flavor, making them a classic choice for recipes like Banana Pudding.
Are Vanilla Wafers being discontinued?
No need to worry! Vanilla Wafers aren’t being discontinued. They remain a popular snack choice for many. Sometimes, products may disappear temporarily from shelves due to supply chain issues or packaging updates, but they’re not going anywhere. So, next time you crave a sweet, crunchy treat, you can always count on those delicious Vanilla Wafers to be there for you.
What is a substitute for Nilla Wafers in Canada?
If you’re in Canada and can’t find Nilla Wafers, don’t worry! You can use any simple, sweet, and crunchy biscuit or cookie. For example, try using Lorna Doone shortbread cookies or even graham crackers. They’ll still give you that satisfying crunch in your recipes. Just break them into small pieces and use them as a base for your favorite desserts!
What does vanilla extract do to cookies?
Vanilla extract works like magic in cookies! It adds depth and richness to the flavor, giving them that irresistible aroma. When added to your cookie dough, it enhances the sweetness and complements other flavors like butter or chocolate. You’ll notice that the cookies taste much more balanced and delicious. It’s like giving your cookies a secret ingredient boost!